How to record a video lecture with PowerPoint
Video lectures are an engaging way to share your knowledge. And the best thing is that you can create them on your own with just a few pieces of equipment and software tools. Check out this step-by-step guide to learn how to make good video lectures using PowerPoint and iSpring Suite hassle free.
Contents:
How to make a video lecture with PowerPoint (PPT)
How to record lectures with iSpring Suite
What Is a Video Lecture?
A video lecture, or a video lesson, is an educational video that focuses on a particular topic. This format is usually used in universities to deliver information on various science-related topics. At schools, teachers record lectures on art, biology, chemistry, and many other subjects.
Lecture recordings can fall under several categories: it might be a talking-head video with a professor/ lecturer/ instructor speaking to the camera, a “lecture capture” of class lectures, slides with voice-overs on the topic, demonstration videos, or a screencast. It can also take the form of an “interactive lecture” — in this case video, audio, PowerPoint slides, and other features are combined.
All in all, making video lectures is now prevailing over other methods of teaching, as it helps engage students all over the world in listening to interesting lectures in the digital learning environment.
The most common way to create a video lecture is by using a webcam and a microphone to capture the presenter, a screen recorder for capturing the screen, and then polishing lecture videos with a video editing tool to make them look more professional. By the way, if you are in search of the best recorders, read our material on the top six cameras for video lectures. In this article, however, we’ll show you how to make video lessons using PowerPoint.
How to Record a Video Lecture in PowerPoint
We hope you already have PowerPoint installed on your computer. If so, launch it, and let’s get started.
-
Open the PPT presentation you want to turn into a video lecture. Go to the Slide Show tab.
-
Select Record Slide Show, then Start Recording from the beginning.
-
Click on Start Recording.
Please note: Before you actually start recording your video lecture, we recommend you to test the entire process. So, build a few slides to make sure you understand how to go from one slide to the next (using arrow buttons) and how to pause and stop the recording (using familiar buttons). Once tested, return to this step and record your video lecture.
-
Leave the recording menu by clicking Esc.
-
Go to the File menu and select Export. Then click Create a Video. And then click Create a Video again.
-
Select the folder you’d like to save your video lecture in.
And that’s it! Just wait till the file is saved, and then share it with your learners however you like: upload your video to Moodle or any other LMS, YouTube, or Google Drive – whichever platform you prefer.
However, PowerPoint doesn’t offer great recording or editing capabilities, so if you want to get a high-quality video lecture, consider using a different tool. You can try iSpring Suite, for example. It works as a PowerPoint add-in, so there’s really not a big difference in usage, only greater capabilities. For example, you can remove background noise, edit your footage, enhance it with texts, images, etc., and even add a quiz to check how attentive your students were during the lecture.
Recording Video Lectures with iSpring Suite
1. Download lecture capture software
Download the free iSpring Suite trial version and install it. A new iSpring Suite tab will then appear in your PowerPoint.
Note: iSpring was designed to be a Windows app. However, you can access it on Mac, in case you install Microsoft Windows on your computer. Learn how to install Windows on a Mac
So, to create a video lecture, just open PowerPoint.
2. Record video narration
There are two options you should consider, based on whether you have pre-recorded video files or not.
a. If you already have a pre-recorded video:
Just insert it using the iSpring Narration Editor. You can add a video recording in one of the following formats: AVI, WMV, MPG, MP4, or MKV.
To embed your original video, click the Manage Narration icon on the iSpring Suite toolbar.

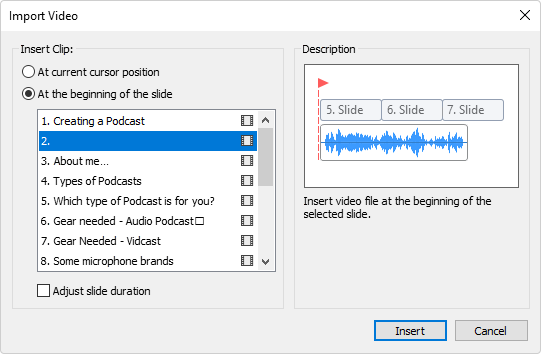
Then in the iSpring Narration Editor, click Video to import a file from your computer.

After that, you will see a pop-up window where you can choose the location of the video within your presentation.
b. If you need to record a video narration from scratch:
First, make sure that your camera and a built-in or external microphone are turned on and ready to record. If you’re recording a webcam video for the first time, you will need to go through the Microphone Setup Wizard.
Click the Record Video icon on the iSpring Suite toolbar.

To make it even easier, use the Slide Notes on the right panel to insert your script.
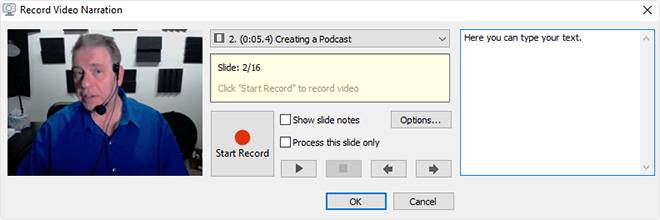
Click on Start Record when you are ready to start recording. To finish, click OK.
You don’t have to record a perfect narration in a single take because you can always polish it and remove some mistakes later with the built-in audio and video editor.
Take a look at how to record video narration in our video tutorial.
3. Edit your video narration
When you’ve finished your video (either imported or recorded), you need to synchronize it with your PowerPoint slides and make some adjustments to achieve a high-quality video.
How to edit your video:
Fine-tune your video right in iSpring Suite using the built-in editor. Choose the video on the timeline and click the Edit Clip icon.

After doing this, you will see the following pop-up window:
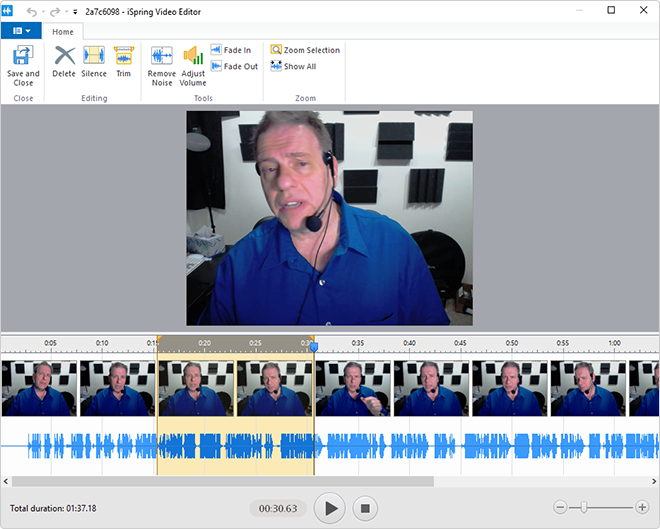
You will have the following editing options:
-
Delete. To delete a fragment of the video, choose the unnecessary part on the timeline, and press Del on your keyboard or the Delete button on the toolbar.
-
Clean. To make the sound cleaner, to avoid false starts, for example, you can silence any part of the narration. To do this, select the desired segment and click the Silence icon.
-
Trim. The trimming option helps you get rid of clumsy segments at the beginning and end of the video. To do this, select the part you wish to leave, and click Trim.
-
Improve. The Remove Noise and Adjust Volume options allow you to get high-quality audio.
-
Transition. Finally, the Fade In and Fade Out effects allow a smooth transition of the audio recording from one part to another. They are often used to fade music in and out at the beginning and end of a video, respectively.
Now that you reviewed your video lecture material, click Save & Close in the upper left corner to preserve the applied changes.
How to synchronize your video and slides:
Here’s what you need to do if you want to combine your webcam video with PowerPoint slides.
Launch the iSpring Narration Editor by clicking Manage Narration. Select a slide on the timeline and hit the Sync button.

A Sync panel will appear above the timeline. To start the process, click Start Sync.
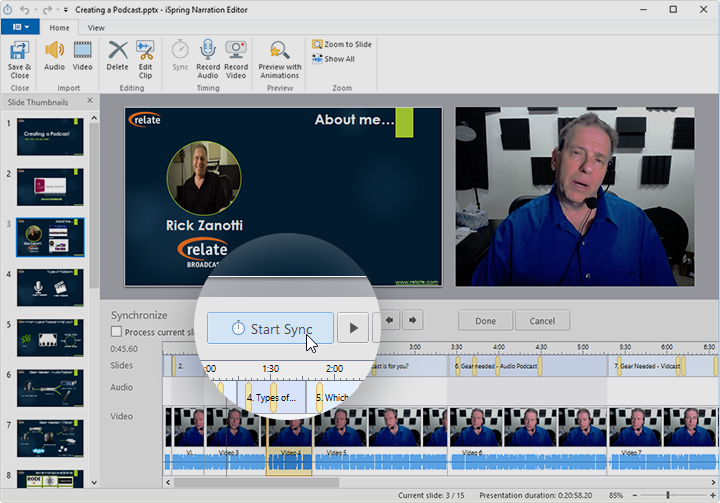
The Start Sync button will be replaced with the Next Slide/Next Animation/Skip Transition buttons, depending on the upcoming element in your presentation. Click on them at the appropriate moments; for example, when you want the next animation to be inserted.
When you have finished, click Done and then Save & Close in the upper-left corner to close the narration editor.
Learn more about how to edit a video from our tutorial.
Advice: You can also edit your video in iSpring’s advanced video studio, which is also included with iSpring Suite and lets you add transitions, hotkey hints, freeze frames, captions, and more.
4. Add some interactivity to your video lecture
There is no doubt that video lectures can be really captivating on their own. However, you can increase student engagement even more by adding some interactive features. Plus, it will assist your learners in taking notes during the lecture.
With iSpring Suite, it’s easy to record a lecture, and equally easy to populate it with the following interactive elements:
- Quizzes with 14 question types: multiple-choice, drag-and-drop, hotspot, and more
- Web objects (like an entire web page, Vimeo and YouTube videos)
- Interactive templates (Tabs, Accordion, Pyramid, Media Cards, and more)
- Dialogue simulations
- Screen recordings
- Characters, backgrounds, icons, and slide templates

All these content types will be available in the interactive video player of your lecture.
5. Change the video lecture layout
With iSpring Suite, you can shift learners’ focus from the slide to the video narration and back. To do this, click Player on the iSpring Suite toolbar. In the open window, you can change the player type. Click Select Player on the ribbon to do this.
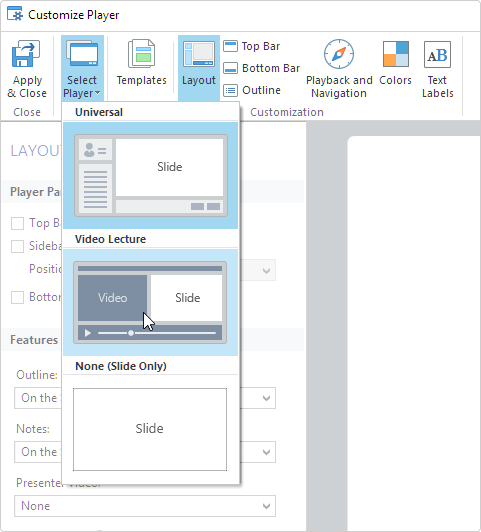
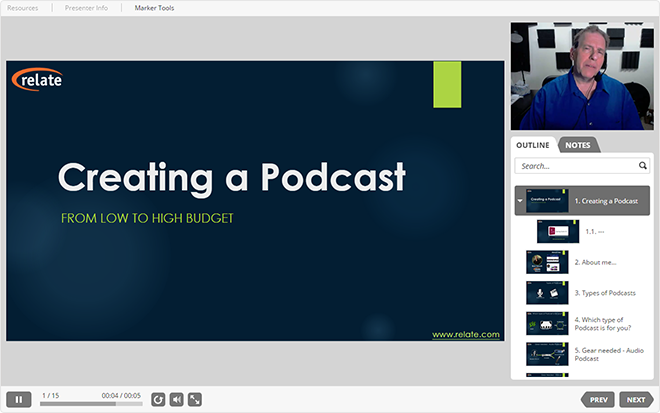
There are three types of players:
- Universal. This is a player with flexible options that allows you to combine slide content, a small presenter video, course outline, and various panels and controls.
- None. This layout makes your students pay attention to the contents of the slide. Learners can study the information on the slide without being distracted by the speaker’s comments.

- Video lecture. Use this type of layout if both slide and video to explain the information in the most effective manner.
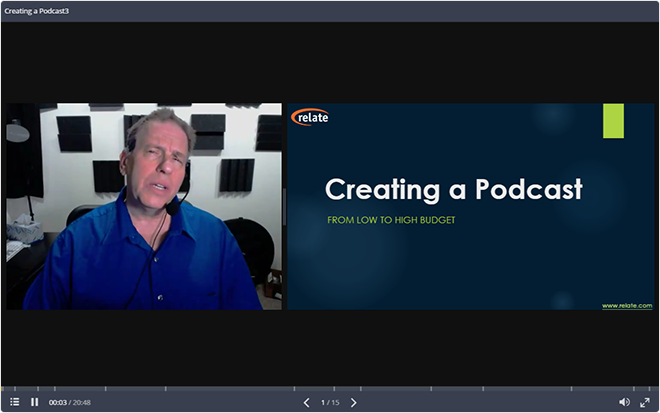
Combine different types of layouts to highlight the most important parts of your lecture content.
Advice: You can adjust the layout to change the proportion between slide and video by dragging the border between them.
Click Apply and close to save changes and return to the lecture.
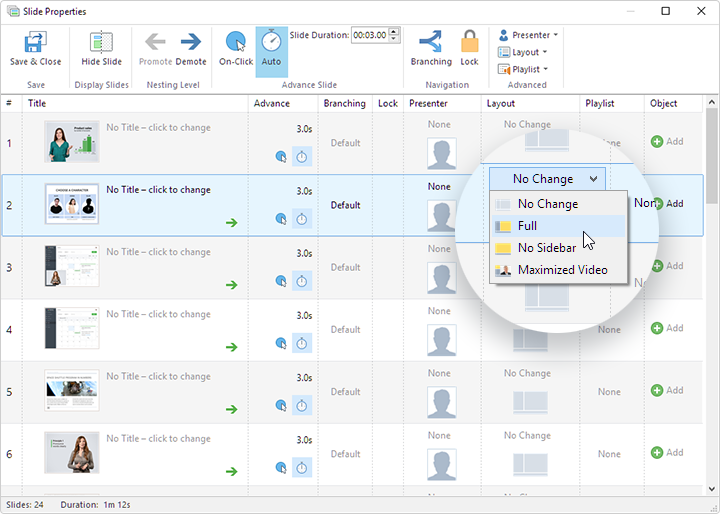
iSpring Suite also allows you to fine-tune the player layout for each slide separately. To do this, click Slide Properties on the ribbon.
A new window will open in which you can change the slide layout for each slide to highlight the most important parts of your video presentation:
6. Share your video lecture
After you record your lecture and make it attractive, you can share your lecture with your students online. To do this, click the Publish button on the toolbar. You can post your recorded lectures on the website, a cloud sharing service, a learning platform, or send them by email.
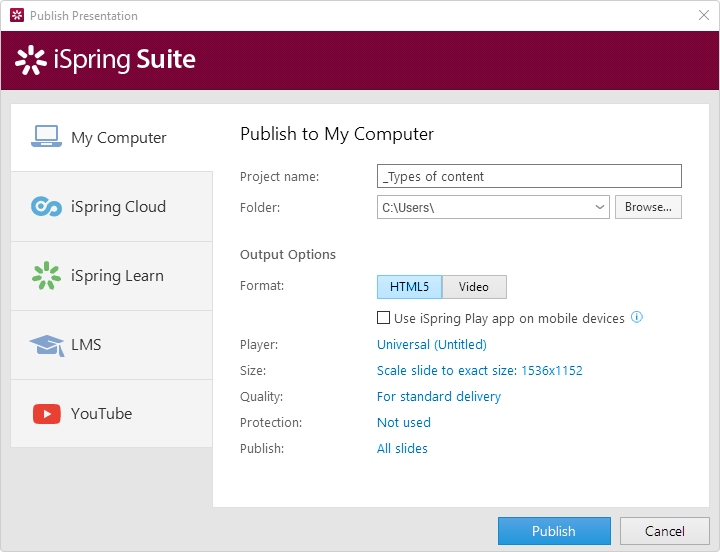
Your video lecture will be published to HTML5 format and will play on any device. Learners will be able to view it on computers, tablets, and smartphones.
And if you use iSpring Learn LMS, here’s a quick and easy step for publishing your videos and other learning content.
7. Publish your video lectures with iSpring Learn LMS
No matter who your learners are: school pupils, college students, or corporate employees, the easiest way to share a video lecture with them is to upload it to a learning management system (LMS). An LMS like iSpring Learn is a specific training software that offers you a single shared place to store online courses, lectures, readings, etc., and track learner progress.
Here’s how to publish a lecture to iSpring Learn LMS directly from iSpring Suite:
-
In the publishing window, choose the iSpring Learn tab.
-
Sign in to your iSpring Learn account. If you don’t have the LMS yet, please sign up for a free trial first.
- Choose the desired file destination and click Publish.
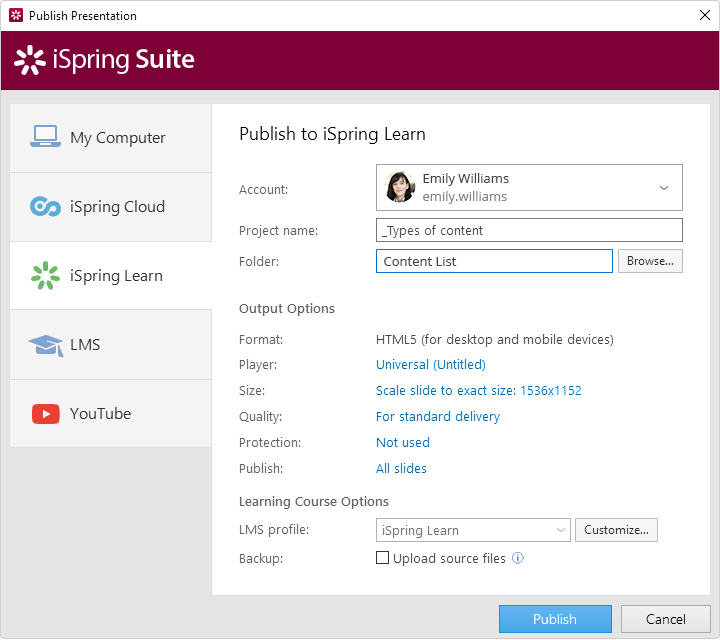
In your iSpring Learn portal, you can assign the video lecture to learners and keep track of how they’re watching it. Your learners, in turn, will be able to watch a video lecture whenever and wherever they want to, from their PCs, laptops, and mobile phones, using the iSpring Learn mobile app.
Check out the iSpring Learn page to learn more about its capabilities.
You can also have a look at how to publish an online course for an LMS in our video tutorial.
Tips for Recording Engaging Video Lectures in PowerPoint (PPT)
Just recording a video is not enough for a cool learning experience. Here are a few helpful pieces of advice to make your video lectures more effective and engaging for learners.
Keep lectures bite-sized
Learners will find it easier to watch a short, concise video rather than a one-hour classroom lecture with a lot of details. So, you should divide your lecture content into a series of videos of up to 7 minutes each. This will allow you to support learners as they navigate through the parts of the course and help them refresh some particular topics if needed.
Follow a narrative structure
Start every new video with a brief outline of what you’ve studied in the previous parts and where you are now. Summarize your ideas at the end of the video so your learners can memorize them better, process the information, and take notes. Feel free to learn more about the narrative structure for your talking head videos here.
Communicate with your audience
In online teaching, it’s the top priority to make lectures dynamic, not monotonous. Be open and positive for learners even though they’re seeing you in recording, and not in person. It’s important to maintain contact with your learners and include some humor, emotions, and a human touch in your lectures when they go digital.
Ask questions
If you pose a question to the audience at the end of a video, this really feels like you’re talking to your learners, and this makes them anticipate answers. They will be eager to continue watching a lecture. It’s even better if you prepare quizzes to test how well they understand the new material.
FAQ
Here are a few questions about video lectures. Let’s go over them briefly.
1. Why Video Lessons and Online Education Are So Popular?
Video lessons became extremely popular during the COVID-19 pandemic when everyone had to stay indoors and all educational organizations began to practice online classes. While many instructors used Zoom and other web conferencing tools to conduct video lectures online, some created online courses and video content, providing their own video lectures. With a large number of students, this approach proved most effective: teachers simply needed to create learning content once and then share it with their learners whenever necessary. In addition, it can solve some other issues, like accessibility — in the past, people with disabilities found it difficult to enroll in educational programs, and now they can study from home.
2. What is the best way to record a video lecture for students?
We believe that one of the great ways to make a lecture recording is by using PowerPoint itself. You can easily record, edit, and annotate any type of instructional video with iSpring Suite which works as a PowerPoint add-in.
3. How can you record lectures during a class?
Take a simple camera, put it on a tripod, and place it in front of the blackboard where you’ll be delivering a lecture. Utilize a voice recorder to capture your voice better. Or, if you don’t need to show the audience and classroom environment in your video, record yourself with a laptop webcam while presenting in PowerPoint.
4. Which app is best for recording video lectures?
You can record video lectures in different ways. The best solution depends on your needs, experience, and the time you have to master a new tool. And if you want a user-friendly one-stop-shop tool, opt for iSpring Suite Max. If you search for apps for recording video lectures on Android or iOS devices, consider using a screen recording tool like Screencast-O-Matic.
To create your first video lecture today, get started with a 14-day free trial of iSpring Suite.
Here are some other articles you might find useful:
If you still have any questions, please ask them in our Community Forum.
Related Articles
