How to Create a Course in Moodle

A lesson in Moodle is a complete training session with theory and practice. The theory helps to convey knowledge with the help of lessons containing text, images, and videos; hands-on activities such as quizzes (check out our guide on creating quizzes for Moodle) allow you to check how much the student has learned.
Creating a lesson in Moodle will take a new user from 30 minutes to an hour. If you need to make it quicker and easier, you can use the iSpring Suite authoring tool. In this article, we’ll demonstrate how to build the same lesson in Moodle and in the iSpring Suite authoring toolkit, so you can decide which tool works best for you.
Creating a Lesson in Moodle
As an example, we’ll build a course on Workplace Safety rules and a lesson on Fire Safety. To continue, you’ll need to sign up to Moodle Cloud and get the source file with text so you can just copy and paste it in the sample lesson.
Step 1: Create a New Course in Moodle
According to the logic of Moodle, you can’t create a lesson without creating a course first. To create a new online course, go to Site Administration → Courses → Add a New Course. Enter full and short course names (“Workplace Safety”) and click Save and Display.
Now enroll yourself in the course; this way, it’ll appear in the list of available courses. Click Enrol users, enter your name in the pop-up window, and choose Manager from the dropdown menu. Then click Enrol users.


If you don’t assign yourself a manager role, you’ll have to spend some time to find this course in the admin panel.
Step 2: Add a Lesson to the Course
For convenience, let’s edit the topic name and rename Topic 1 into Fire Safety. Then click +Add an activity or resource. The Moodle toolbar will appear on the screen. Choose Lesson in the Activities section and click Add.
In the new window, we’ll need to set up four sections:
- General: Enter the name of the lesson and its description.
- Appearance: Configure the lesson design. Would you like learners to see a progress bar or demonstrate the lesson as a slideshow?
- Flow Control: Set up the rules for taking the lesson. For example, it’d be wise to allow learners to view the lesson on fire safety several times, but for an exam session, it’s better to give just one attempt.
- Grade: Determine the rules of assessment. Will you use points or a scale to evaluate the results? What is the passing grade? For the sample lesson, set four points as the passing grade as there are four test tasks.
Click Save and display.
Step 3: Create a Question Page
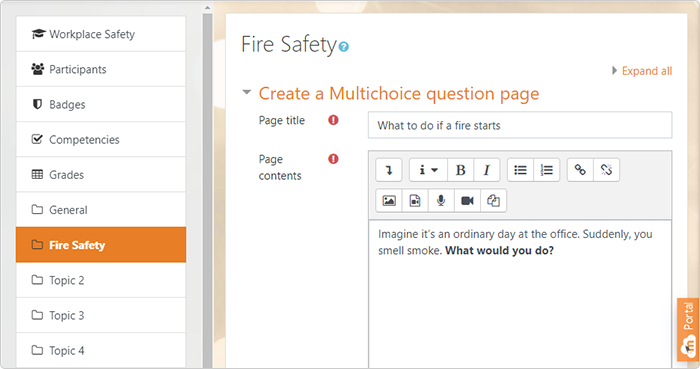
Our sample lesson starts with the question “What do you do if you smell smoke?” To add it, click Add a question page in the Actions column. In the new window, select Question type; select Multichoice for the sample and click Add a question page.

Once again, you find yourself on a new page. Do the following general setup for the question:
Page title | What to do if a fire starts |
| Page contents | Imagine it’s an ordinary day at the office. Suddenly, you smell smoke. What do you do? |
| Answer 1 | I’ll look around to find the nearest stairway, leave all my belongings, and run to the exit. |
| Response | Right. You didn’t panic and got out. Yet you managed to breathe in smoke, as you didn’t protect your nose and mouth while evacuating. |
| Answer 2 | I’ll pack up and go to the nearest exit. |
| Response | Wrong. When there’s smoke in the building, you must leave immediately. By wasting time on packing things, you may lose your chance to get out, as smoke and fire spread very quickly. |


You should get the following question page.
Click Save page.
Step 4: Create a Content Page
The content page is a building block for creating a lesson in Moodle. It may contain text, pictures, audio, or video. Click Add a content page to create one, then enter a page title and its content.
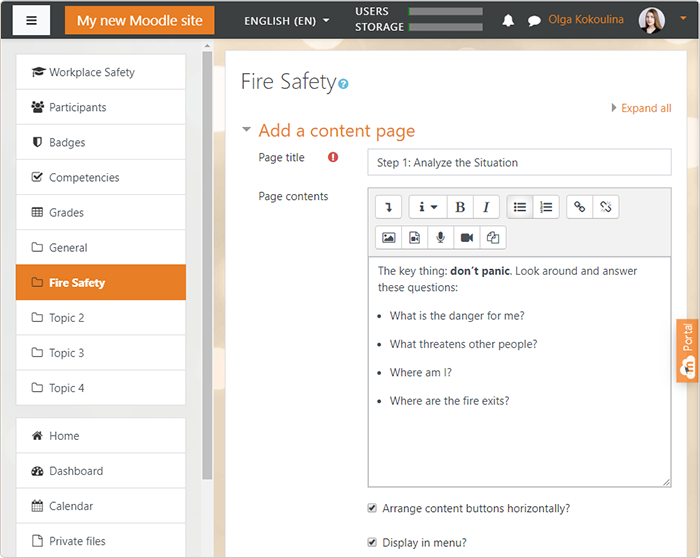

Below, you’ll also see a Content 1 (Content 2, Content 3, and so on) section. Using these fields, you can set up navigation within a lesson. Each Content is a button that forwards a learner to another slide of the lesson. For instance, you can create buttons for every page of the lesson, so learners will be able to jump from the first page to the last one. If you prefer closed navigation and don’t fill in the Content fields, then learners will have to study the pages one by one.
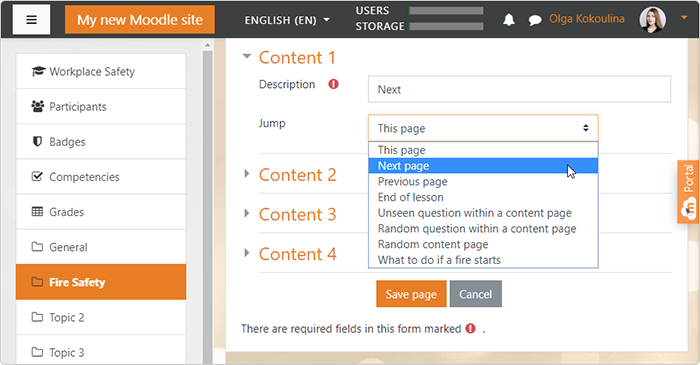

For our sample course, we’ll set up closed navigation and create just one button, Next, that leads to the next page.


For the sample course, we don’t need any extra navigation buttons except Next.
Step 5: Add More Content and Question Pages
Create the rest of the pages using the lesson source file. Also, don’t forget to create the Next button by entering the word Next in the Content 1 description and choose to jump to Next page on each new page you add.


In the end, you should get the following structure:


The structure of a lesson
The lesson is ready. You can preview it through the admin panel.


The preview of the Fire Safety sample lesson.
Creating a Lesson in iSpring Suite
The built-in Moodle editor isn’t the only tool for creating lessons and courses for Moodle. You can also use the iSpring Suite toolkit, a powerful PowerPoint add-in that allows you to quickly build interactive courses in a familiar environment.
Here’s what the same lesson on Fire Safety looks like with iSpring Suite:


To continue, you’ll need to sign up for an iSpring Suite free trial.
Step 1: Create Info Slides
Create a new PowerPoint presentation. Most of the slides of the sample lesson are just text supplemented by images; we even won’t need to use any additional functions so far; just create enough slides and fill them with information from the source file.
You can set custom backgrounds for each slide to make them more informative and attractive. Go to the Design tab and click Format Background. Choose Picture or texture fill in the right pane and then select an image you’d like to use from your computer. For the cover page of the Fire Safety lesson, we used a photo with firemen.


With iSpring Suite, you can use the familiar PowerPoint interface to create info slides.
Step 2: Add Quiz Questions
In the sample lesson, there are four test questions. While you can create six basic question types with the built-in Moodle editor, there are 14 types of tasks in iSpring Suite. Go to the iSpring Suite tab and click the Quiz icon to launch the Quizmaker tool.


iSpring Quizmaker allows you to create 14 types of question such as Sequence, Matching, Drag & Drop, and more.
In the new window, choose Graded Quiz.
The first test question in the lesson is a Multiple Choice. Click Question in the upper left corner of the ribbon and choose the necessary question type. If you pay attention to the preview icons in the drop-down list, you’ll get an idea of how each question will look on the slide.


Place the cursor on the question type to see the preview.
iSpring Quizmaker has an interface that is similar to Microsoft Word, so it’s easy to work with text. Fill in the Question, Choices, and Feedback fields using the text from the sample. Then go to the Quiz Results section in the left pane.


You can also customize the question slide design using Slide View.
In the Quiz Results, enter custom feedback for learners who pass or fail and un-check all the boxes, save for Allow user to retry quiz (for the Failed tab), in the Result Slide Options to the right. In our sample, we don’t need to show the user’s score or set a passing score, so we’ll leave only one button, Retry, on the Results slide. You can experiment with different configurations and click Preview on the ribbon to see what it’ll look like.


Set up Result Slide options.
Let’s add three more questions. To make the lesson more interactive, let’s use some question types that aren’t present in the Moodle editor.
Sequence question. You can ask learners to choose not only one response (What should you do first when you smell something burning?), but organize options — in our case, actions during a fire — in the correct order.


Drag and Drop question. The task is to check if learners remember what they should use to put out burning computers. The drag and drop feature turns an ordinary question into a game, where the learners can pick up different objects and throw them at the fire.


Trying to suppress a virtual fire is more engaging than answering theoretical questions.
Hotspot question. When we created this lesson in Moodle, the last task was to examine the picture, find the safety violations, and write down the answer. Hotspot allows learners to avoid typing an essay and mark the violations right on the picture. In our example, the learners should click on the boxes that are blocking the passage.


Show, not tell.
When creating questions, you can also check how they look in the Slide View and customize the fonts and size of text and objects, and insert images.
Step 3: Publish to Moodle
When the lesson is ready, you can see what the content looks like on different devices in the Preview mode and click Publish on the ribbon.


In the pop-up menu, select the LMS tab. Using this setting, you can prepare a lecture or test for a learning management system such as Moodle.
Select a folder on your desktop where iSpring Suite will save the lesson. Choose SCORM 1.2, the format Moodle recognizes, under LMS Profile. Then click Publish, and the archive with the quiz will appear in the specified folder.
To Sum Up
We’ve covered two ways to create courses for Moodle: using the built-in editor and the iSpring Suite toolkit.
The benefit of the Moodle editor is that it’s free and you can build content right on the platform. The main disadvantage is its complex interface. Every content item — a course, a lesson, or a quiz — consists of individual pages; each page must be individually set up. In short, many steps must be taken to prepare a lesson that will catch the learner’s attention.
iSpring Suite, on the other hand, has an intuitive interface that allows you to quickly build professional-looking lessons for Moodle without the need to create numerous pages and master the interface.
With iSpring Suite, you’ll be able to convert PowerPoint presentations into online courses, create interactive simulations, edit video, and much more. There’s a 14-day trial version of the toolkit; theoretically, that’s enough time to create dozens of lessons for Moodle.